picoCTF 2022 - Operation Oni
Write-up | picoCTF 2022 | Operation Oni
Description
Download this disk image, find the key and log into the remote machine. Note: if you are using the webshell, download and extract the disk image into /tmp not your home directory. Additional details will be available after launching your challenge instance.
Hint: None
Initial steps
We are provided a disk image file named disk.img.
I do fdisk -l disk.img (-l stands for “list) to see the partition list of the disk image.
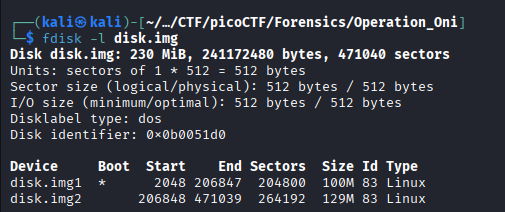
I extract these two partitions via dd (Data duplicator):
First partition:
dd if=disk.img of=disk.img1 bs=512 skip=2048 count=204800Second partition:
dd if=disk.img of=disk.img2 bs=512 skip=206848 count=264192
if=: Input file.of=: Output file.bs=512: Block size. In the picture above, we can see that each sector takes up 512 bytes.skip=: Skip to the start of the partition and start extracting from that point.count=: The number of sectors that need to be extracted.
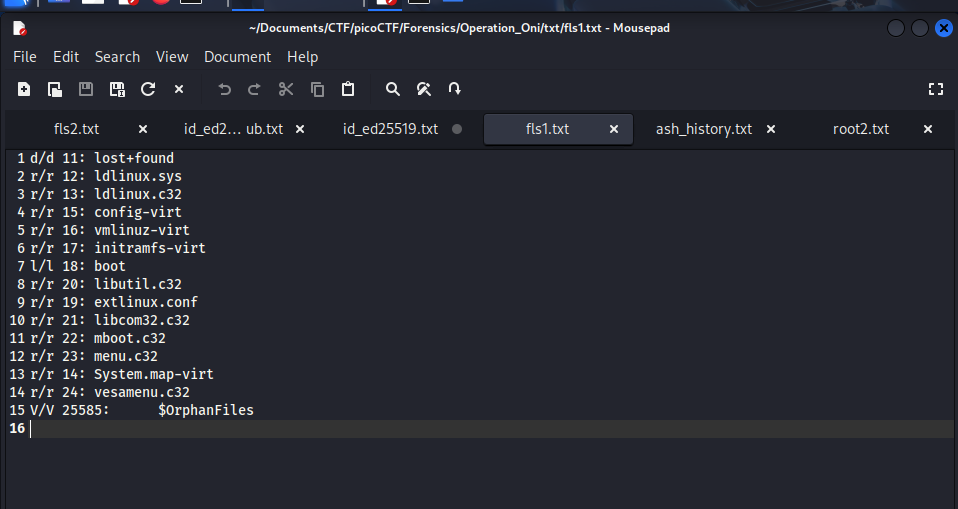
Now we got two separate partitions to analyse. I execute fls -r <img name> (-r stands for “recursive) to see all files and folders inside each one.
In disk.img1, there’s nothing special as usual:
However, disk.img2 contains the root directory, and I notice there’s two interesting files in it:
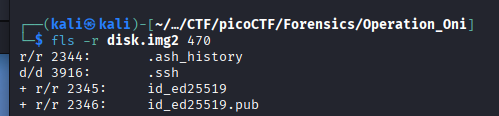
These are public and private keys of Ed25519 encryption, and seems like we need the private one to log in the remote machine.
Bonus knowledge: If you want to know whether a public key and a private key is from a same encryption session, do this:
- Use
ssh-keygen -l -f <keyfile>for each key and export these to two separate.txtfile. - Use
diff -u <private.txt> <public.txt>(-ustands for (unified)) to confirm.
Vulnerability analysis
Potential vulnerabilities
- Encryption key exposure.
Solution paths
We extract id_ed25519 file from the second partition by executing:
icat -i raw -f ext4 disk.img2 2345 > id_ed25519.txt
-i raw: Image type.rawmakesicatcopy bit by bit of the image.-f ext4: File system type. When usingfsstat, we can confirm the type of this img isext4:

We do not use -r (recover) since this file was not deleted.
We connect to the remote machine by using the file we just got. However, SSH connection requires the key to have specific attributes for private reason, so we need to modify the file permission of the key a little bit:
chmod 600 id_ed25519
Each digit in 600 represents:
6(for owner - you): The sum of 4 (Read) + 2 (Write) + 0 (no Execute)0(for group) : Nothing0(for others) : Nothing
After that, we are now able to connect. Use:
ssh -i id_ed25519.txt -p <provided-port-number> ctf-player@saturn.picoctf.net
After connected, use ls to check the existence of the flag and cat to read it:

Flag
picoCTF{k3y_5l3u7h_af277f77}
DISCLAIMER: The code at the end of the flag may vary between versions, which means it is due to change. The flag provided in this writeup may not valid in the future.
Commands/Tools used
Commands/Tools Purpose(s) fdisk -lDisplay the partition list of the disk image. ddCopy a partition in a disk image and export it. fls -rDisplay all files and directories in a partition. icatExtract file from a partition.
What did we learn?
- See all allocated space in disk image via
fdiskand extract each partition out viadd. - Connect to a remote machine without password via private key.